Sunday, July 17, 2016

Front End HTA


It's been a while and over the last year I have been considering how to take this Blog forward, expand the range of topics and nature of the blog in general. 

To that effect I have decided to change the name to better represent the more generalist nature of the blog. Going forward Blass IT will provide general automation assistance in addition to great deployment solutions.


Recently at a client, it was put to me wow this is great UDI that Microsoft has provided us however wouldn't it be nice if it could handle User authentication. Thats when I put on my scripting hat a gave it some thought and came up with this front end. 


As you can see the Front End is quit simple the user enters in his or her user name in the following format <Domain.FQDN>\<UserName. Assuming the user name is authorized against the Domain both the user name status and the Security Groups associated with which are translated into Task Sequence Variables.

User_Authorized

User_Security_Group_Membership

At lines 309 and 349 a Security Group name may be entered for the HTA to search for in or to validate access. 

As usual this Front End is being released free under the GPL license version 3 or later at your discretion. 

The Front End is downloadable from the following link. Over the next couple of weeks we will be announcing our new web site as well. Finally as always I look foward to hearing from you comments, questions or even requests are always welcome.


Wednesday, June 3, 2015

Installation Automation

Blass Deployment Solutions Installation Automation 

A couple of weeks ago when finishing up a project my then employer asked me about automating future installations and I began to think about it. The vast majority of Enterprise installations today come in the form of an MSI (Windows Installer) or as a MSI with an executable wrapper. After a bit of research it turned out that a Windows Installer is essentially a self contained database containing all the information required to install and remove. Once I discovered this I was quickly able to query the "database" to gather that information.


What it does,

The Blass Deployment Solutions Installation Automation Tool generates six scripts
  1. Install.cmd - A Batch Script that Installs the MSI
  2. Uninstall.cmd - A Batch Script that Removes the MSI
  3. Install.vbs - A VBS script installs the MSI
  4. Uninstall.vbs - A VBS script that removes the MSI
  5. Install.ps1 - A Power Shell script that installs the MSI
  6. Uninstall.ps1 - A Power Shell script that removes the MSI
Download the Blass Deployment Solutions Installation Automation

For an questions or comments please feel free to contact me,

Linkedin Google+ Facebook

Thursday, January 1, 2015

Blass Deployment Solutions PC Suite

A couple of months ago after seeing the number of visits monthly to my previous blog I began working on Version 2.

Improvements

  1. Removed all legacy batch scripts
  2. The code has been completely rewritten in VBS and HTA

New Features


  1. Full Microsoft BitLocker Support
  2. Full Symantec PGP Encryption Support
  3. Password HTA
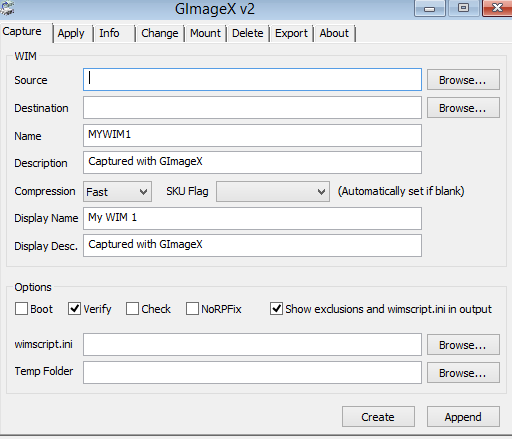
  4. GImageX (A freeware imaging tool for creating WIM files now included natively.)
  5. A redesigned user interface

      Deploying the Blass Deployment Solutions PC Suite

Beginning with this version I have taken the liberty to supply you with two scripts for deployment purposes.

  • ApplyWinRE.vbs
As it's description intimates it's purpose is too apply with WinRE.wim to computers via the SCCM package feature or MDT Application feature for those in a pure MDT environment. This can be included in an Operating System Deployment Task Sequence as I will shortly demonstrate.

  • WDS-WinRE.vbs

As the title of this script suggests it's purpose is the traditional approach for centralized management of Boot Images via the Windows Deployment Server. This script allow the use to upload the new WIM to the WDS when run as a package from SCCM, again either as a regular deployment or during as part of a larger Task Sequence. 

Creating the Package 

The bellow screen shots and explanations will be exclusively from Microsoft Deployment Toolkit (MDT) as I do not have a personal Microsoft System Center Configuration Manager (SCCM) infrastructure.

  1. Open the MDT Console 
  2. Navigate to the Applications Node 
  3. Navigate to the appropriate folder, in my case for my more custom projects I place the package in Scripts 
  4. Right click on the folder and choose New Application 
  5. Leave the default settings and click Next 
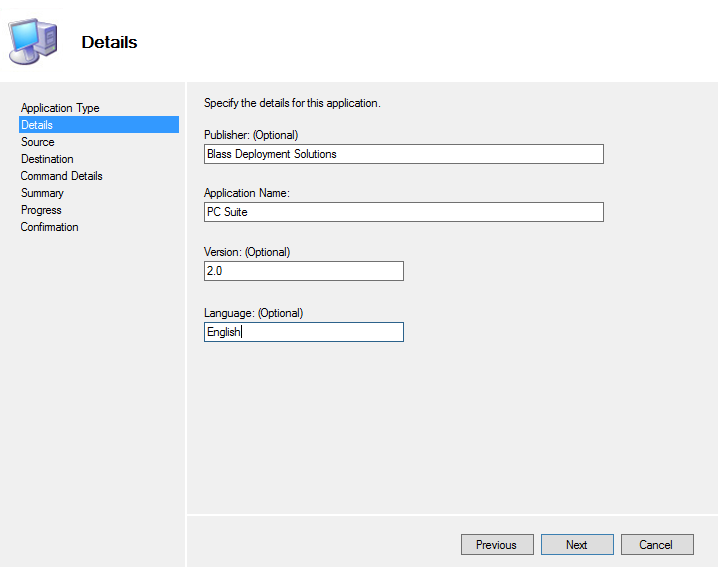
  6. Please fill in the appropriate information as seen in the screen shot 
  7. Choose the appropriate Source Directory and click next 
  8. Click Next 
  9. For the Command Line it is important to include the full command line, 'cscript //nologo ApplyWinRE.vbs' 
  10. Click Next 
  11. Wait for the process to finish and click Finish 
  12. Right click on the folder where you would like to store the WDS-WinRE.vbs and choose New Application 
  13. Choose Application without source files or elsewhere on the network to prevent doubling up on the files in the Deployment Share 
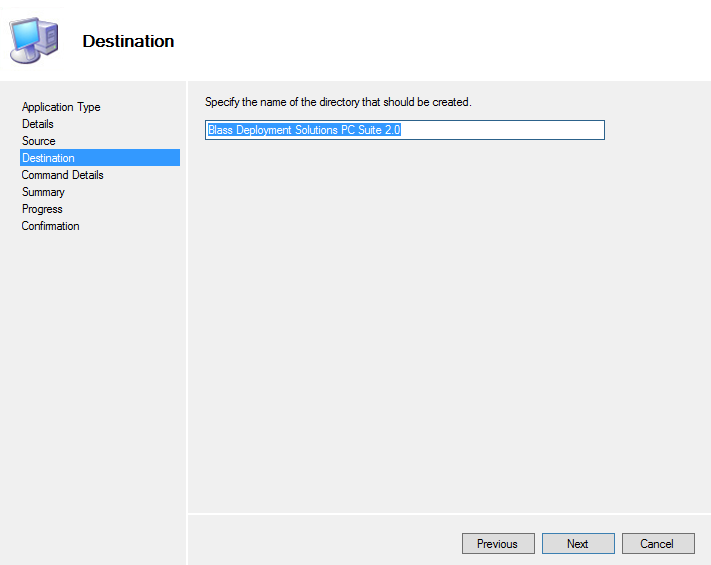
  14. Please enter the appropriate information as seen in the screen shot 
  15. Please provide the full command line once again 'cscript //nologo WDS-WinRE.vbs' and the Source Folder this can be found in the <Deployment Share>\Applications\Blass Deployment Solutions PC Suite 2.0 
  16. Click Next 
  17. Click Finish 
Now if all went as expected you should have two new applications

Hide the Applications from the Applications Menu During Operation System Deployment (OSD)

  1. Right Click on one of the newly created applications and choose Properties 
  2. Check Hide this applications in the Deployment Wizard and click Apply 
Note: Please repeat for the second application 

Add the Blass Deployment Solutions PC Suite 2.0 to a Task Sequence for local deployment

  1. Navigate to the Task Sequence node in the console 
  2. Right click on your Task Sequence and choose Properties 
  3. Choose the Task Sequence Tab 
  4. Scroll down to the folder that will contain your newly created application beneath the Install Applications step and left click 
  5. Click on the Add button -> General -> Install Application 
  6. Choose Install a Single Application 
  7. Click Browse and Select the Blass Deployment Solutions PC Suite 2.0 Application 

  8. Copy and paste the name of the application into the Name field 
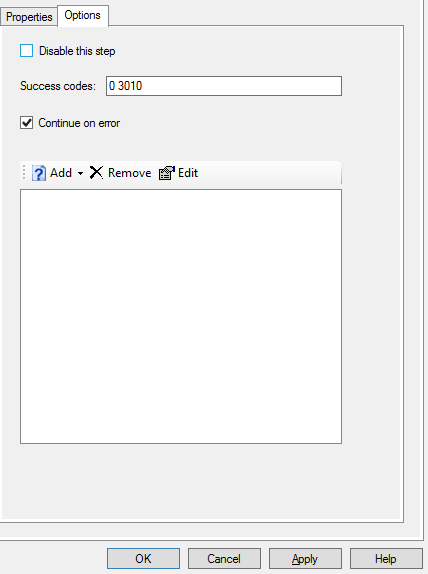
  9. Choose the Options Tab 
  10. Check the Continue on Error check box 
  11. Click Apply and you're done 
Note: For testing one may run the ApplyWinRE.vbs manually on a test computer, in order to determine if it worked you may use the reagentc command line tool.

REAGENTC.EXE <command> <arguments>

The following commands can be specified:

  /info             - Displays Windows RE and system reset configuration
                      information.
  /setreimage       - Sets the location of the custom Windows RE image.
  /enable           - Enables Windows RE.
  /disable          - Disables Windows RE.
  /boottore         - Configures the system to start Windows RE next time the
                      system starts up.
  /setosimage       - Sets the location of the recovery image used by system
                      reset.
  /setbootshelllink - Adds an entry to the Reset and Restore page in the boot
                      menu.

For more information about these commands and their arguments, type
REAGENTC.EXE <command> /?.

  Examples:
    REAGENTC.EXE /setreimage /?
    REAGENTC.EXE /disable /?

Adding the Blass Deployment Solutions PC Suite to the WDS Console 

  1. Open the Windows Deployment Server (WDS) Console
  2. Open the Servers Node and Select Your Server 
  3. Open the Boot Images Node 
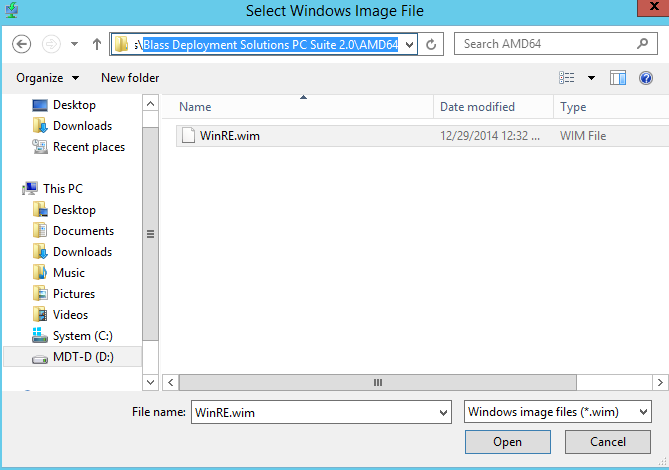
  4. Right click on Boot Images and choose Add Boot Image 
  5. Browse to the location of the WinRE.wim, '<Deployment Share>\Applications\Blass Deployment Solutions PC Suite 2.0\AMD64\' and click open 
  6. Click Next 
  7. Enter a name and description as seem bellow 
  8. Click Next 
  9. Click Finish 
After PXE booting your computer you should get the following option
The same can be accomplished by simply double clicking on the WDS-WinRE.vbs script but for only one server this may be just be easier for some and as I keep saying keep IT simple. 

If all went well regardless of which method you use, triggering the Windows Recovery Environment through faulty starts as a replacement for the standard Windows Recovery Environment or through PXE boot you will get the following menu. 

Macrium Reflect Free

Windows Command Prompt

GImageX

Microsoft Diagnostic and Recovery Toolset 8.1

As usual the WIM image and all of my scripts are free for use as is with no actual or implied warranty, you may find them at the following Blass Deployment Solutions PC Suite 2.0. As usual I want to warmly encourage all my readers to contact me via any of the following mediums or comments section bellow, comments, questions and even requests are always welcome.


Tuesday, October 21, 2014

Affecting Changes to Image During Deployment via Uanattended

In my last blog we began discussing images thin verses thick and how to affect changes when using a thin image. Recently while at a client I got asked what about features, lets say I use the standard Windows image deploying updates via the Task Sequence, and application as well, then how about regular Windows features.

There are two potential solutions to this issue the first is the Microsoft Windows System Image Manager and the second is scripting by way of Deployment Image Service Management Tool or DISM for short.

The two examples that I will demonstrate bellow are

  1. Adding Microsoft .Net Framework 3.5.1 to Microsoft Windows 8, Microsoft Windows Server 2012, Microsoft Windows 8.1 or Microsoft Windows Server 2012 R2
  2. Changing the Default Internet Explorer search engine to Google

Deployment System Management Tool

DISM is a command line tool that is used to affect changes either on a mounted image (WIM) file or on a deployed Operating System for Microsoft Windows 7, Microsoft Windows Server 2008 R2, Microsoft Windows 8, Microsoft Windows Server 2012, Microsoft Windows 8.1 and Microsoft Windows Server 2012 R2.

  1. Open the Microsoft Windows System Image Manager as Admin 


  2. Choose File -> Open Answer File 
  3. Select the Appropriate .WIM image file 
  4. Importing the image to the console may take some time as it requires a Catalog File (.clg) this file is created automatically if one does not exist however depending on on your system it may take as much as a few hours the first time. 
  5. You may either choose to create a new Answer File or import the existing one, I recommend that you utilize the existing one that MDT or SCCM create when you build the Task Sequence the first time. 
  6. Your Unattend file should be located for MDT in the \\<MDT Server>\DeploymentShare$\Control\<Task Sequence ID>\Uanttend.xml 
  7. In the Windows Image field there two trees one for components and another for packages, components contains all the possible changes that can be affected for your Windows Image, packages contains all the possible features that can be added for your image. First things first we will add to new features to our image the first being Microsoft .Net Framework 3.5.1 and the second being TelNet Client. 
  8. In the Windows Image Field click on the packages tree -> Foundation -> amd64_Microsoft-Windows-Foundation-Package 
  9. Right Click and choose Add to Answer File 
  10. Two changes should have occurred in the console you should see the package being listed at the bottom of the tree and the second change the options appearing for editing in the far right panel 
  11. At this point select your package of choice from the right hand panel 
  12. Click on the pull down menu on the right hand side and choose enable 
  13. Click File->Save Answer File in order to save the answer file and check that the file can be validated 
  14. Your Message Pane should be free of any related errors as seen bellow 
  15. That's it you have added the Tel Net client to all computers that will receive this answer file.

Setting the Default Search Engine for Internet Explorer

This came up a few years ago we had so many requests in help desk the change the default search engine that my manager asked me if there was a way that I could script a solution. Now sure you can script it which would be great for regular deployments but for simplicity's sake one place for as many changes as possible is always preferable.

  1. Open the Microsoft Windows System Image Manager 
  2. Choose File -> Open Answer File 
  3. Select the appropriate .Wim Image File
    1. Importing the image to the console may take some time as it requires a Catalog File (.clg) this file is created automatically if one does not exist however depending on on your system it may take as much as a few hours the first time. 
    2. On the bottom left hand side within the Windows Image pane choose the Componets tree 
    3. Once the Components branch is opened right click on amd64_Microsoft-Windows-IE-InternetExplorer_11.0.9600.16384_neutral 
    4. Choose add setting to Pass 4 specialize 

    5. Within the Answer File pane amd64_Microsoft-Windows-IE-InternetExplorer_11.0.9600.16384_neutral should now have appeared as an option 
    6. Open the new branch and right click on Search Scopes and choose Insert New Scope 
    7. Insert the below information found in the chart into your Answer File 
      Setting
      Value
      Display Quick Pick
      True
      Favicon URL
      http://www.google.com/favicon.ico
      ScopeDefault (Overwrites Bing)
      True
      ScopeDisplayName
      Blass Deployment Solutions Google Search (Replace Blass Deployment Solutions with your own company name)
      ScopeKey
      1
      ScopeUrl
      http://www.google.com/search?q={searchTerms}&sourceid=ie7&rls=com.microsoft:{language}:{referrer:source}&ie={inputEncoding?}&oe={outputEncoding?}
      ShowSearchSuggestions
      True
      ShowTopSearch
      True
      ShowTopeResult
      True
      SuggestionsURL
      http://clients5.google.com/complete/search?q={searchTerms}&client=ie8&mw={ie:maxWidth}&sh={ie:sectionHeight}&rh={ie:rowHeight}&inputencoding={inputEncoding}&outputencoding={outputEncoding}
    8. Save the File and copy it to the appropriate folder within <DeploymentShare>\Control\<TaskSequenceName> for MDT or add it to the Package for SCCM and your Done.
    QA: Microsoft Windows 7x86, Microsoft Windows 7x64, Microsoft Windows Server 2008R2, Microsoft Windows 8x86, Microsoft Windows 8x64, Microsoft Windows Server 2012, Microsoft Windows 8.1 x86, Microsoft Windows 8.1 x64, and Microsoft Windows Server 2012R2.

    Happy Deployments all and I look forward to hearing from you as usual question comments and even requests are welcome :-)