Wednesday, April 30, 2014

Managing Updates in Microsoft Deployment Toolkit

In MDT Updates are refereed to in the console as Packages, unfortunately MDT does not support direct integration with Windows Server Updates Services however indirect integration is possible.

Adding Packages to the MDT Console

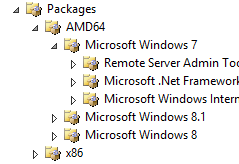
For those of you who have read my previous blogs you'll recognize the structure bellow from the Driver import blog.

·         AMD64
o   Microsoft Windows 7
o   Microsoft Windows 8
o   Microsoft Windows 8.1
·         X86
o   Microsoft Windows 7
o   Microsoft Windows 8
o   Microsoft Windows 8.1

Now that we have established the appropriate structure for our update packages we can import either MSU files or CAB files directly into the structure newly created. This is primarily useful for Service Packs or other non critical updates that would not otherwise be included in your organizations WSUS.


Now that we have created the structure as can be seen above we can proceed to import the update package.

Importing Packages

In addition to creating the basic structure as seen above I recommend for testing to create folders for easier management and detection of faulty updates.


As you can see the in the above example both updates and features can be added and thus injected into the image during deployment.

Updates are added by right clicking on the folder in question and choosing Import OS Packages.
You can choose either MSU files or CAB files for import thus making it an extremely useful approach.

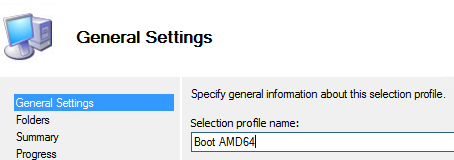
Create a Selection Profile to Focus the Update Selection During the Task Sequence

  1. Open the MDT Console 
  2. Open the Advanced Configuration Node
  3. Open The Selection Profile Node 
  4. Right Click on the Selection Profile Node and select New Selection Profile 
  5. Create One Appropriate for Each of your Operating Systems Making sure that it will be Processor Architecture Dependent
     
  6. Click Next After Entering an Appropriate Name That Both Delineates Operating System and Architecture 
  7. Choose the folder containing the appropriate updates under the Packages Node that you created previously. As in the case of the drivers selection profile selecting the head of the tree will automatically select all objects beneath it. 
  8. Complete the Wizard
  9. Return to the Task Sequence Node 
  10. Open the Appropriate Task Sequence and Scroll down to the Apply Packages task. 
  11. Select the Appropriate Selection Profile and click Apply.

Importing Updates Directly from Windows Server Updates Services

Importing Updates directly from a local WSUS server on your organizations network can provide a seamless way to integrate your organization's update infrastructure with your deployment server. This can be accomplished by adding a single line to your CustomSettings.ini file located at \\MDT-Server\DeploymentShare$\Control.
Add the line: WSUSServer=http://WSUSServer:8530 
The line should be added to the default section of your CustomSettings.ini so that it affects all Task Sequences.
Following this all that remains is enabling the Windows Updates step in your Task Sequence.

  1. Open the Task Sequence Node
  2. Choose the Task Sequence in Question
  3. Scroll Down till you get to Windows Updates (Pre-Application Installation)
  4. On the right pane choose the Options Tab and Remove the Check from Disable this step 
  5. Scroll Down Further in your Task Sequence till you get to Windows Updates (Post-Application Installation) 
  6. Next refer to the right pane, choose the options tab and remove the check for Disable this step. 

Your all done. These options can function independently from one another or together in a hybrid format. Together they provide a wonderful way to keep your deployment time down and your computers up to date upon arrival, without the necessity of updating your image every few weeks.

I hope this helps and by the way I welcome comments, questions and also your own deployment ideas.


Thursday, April 10, 2014

Managing Drivers the Easy Way

Managing Drivers the Easy Way


Managing drivers can be a daunting process particularly in organizations spanning the range between mid-sized and large. On the one hand we want to keep our boot image small on the other hand we want to keep our upkeep as light as possible. As those of you who read my last post know keeping it simple is my motto. 

So lets start with the folder layout...


·         AMD64
o   Network Drivers
§  Lenovo
·         Model 1
·         Model 2
§  Hewlett Packard
·         Model 1
·         Model 2
§  Dell
·         Model 1
·         Model 2
o   General Drivers
§  Lenovo
·         Model 1
o   WLAN
o   Video
o   WWAN
o   Chipset
o   Et Al.
·         Hewlett Packard
o   WLAN
o   Video
o   WWAN
o   Chipset
o   Et Al.
·         Dell
o   WLAN
o   Video
o   WWAN
o   Chipset
o   Et Al.

As you can see I have set up a series of folders on the level I create two categories, one for AMD64 and the other for x86 thus avoiding the dreaded blue screen of death caused by architecturally incorrect drivers. On the next level, network drivers for our boot images, and a separate one for general drivers including the LAN as well will need this driver additionally for the PC being installed. On the next level I create separate folders for each model to allow for debugging in the case of a problematic model. Finally I create separate folders for each driver to allow for even greater debugging of driver failures.

Selection Profiles

The next stage now that we have organized our drivers cleanly and efficiently is to tell the task sequence which drivers to choose. I like to work with four basic profiles...
  1. AMD64
  2. x86
  3. Boot AMD64
  4. Boot x86
This allows me to make sure on the most basic level two things, one no computer or boot image will ever receive drivers that are not architecturally appropriate and two that my boot images will remain lean and mean. As a good rule of thumb I try to never add any driver to my boot images not absolutely required for the machine to boot and receive the Task Sequence. This allows me to keep my boot images small and fast loading even over low bandwidth connections. 

Creating Selection Profiles

Selection Profiles act as filters to make certain that we are only receiving the content that we actually want and can be utilized in numerous ways within MDT.

In order to create one, please open you Deployment Workbench and navigate to the bottom of the tree
Please choose and open the advanced configuration
Once the node has been opened you should see a number of built in options that demonstrate some of the capabilities of Selection Profiles. Please right click on Selection Profiles and choose new selection profile.On the first page of the wizard please enter a name for your selection profile that reflects it's purpose, for example Boot AMD64, for only the 64 bit drivers that you want to add to your boot image.
On the next page we are going to select the folders we want to include, this where we utilize the organizing folders we created in the latter portion of this blog.
As you can see when I choose the top node of a particular tree it automatically selects sub sections as well, thus by choosing LAN I have selected in affect all my LAN drivers under the AMD64 node.

Now we click next till the end and finally we should see our newly created Selection Profile on the list.

Utilizing Selection Profiles for Filtering Drivers

Boot Images

Please right click on your deployment share node within the console and choose properties
Please choose the Windows PE tab 

Choose Drivers and Patches from the selection of tabs underneath
Choose the appropriate Selection Profile form the drop down list and hit apply

Task Sequences

Right Click on your Task Sequence of choice and choose properties
Choose the Task Sequence Tab from top the of the Window
Scroll down to the preinstall node and open it
Click on Inject Drivers

Choose the appropriate Selection Profile and make sure to choose Install Only Matching drivers from the selection profile, again lean and mean is the name of the game. When you are done hit apply.

Happy Deploying