Managing BitLocker Computers in your Organization the easy way...
A couple of days ago my manager came to me asking for a more unified way to manage our TPM enabled computers and to bring up our compliant rate for BitLocker encryption. Now for those of you dealing with multiple vendors as I am this raises large issues as there is very little standardization in the market regarding Bios settings access from within the Operating System.
Challenges to face...
First and foremost what we need to consider is the inconsistency between different Operating Systems and how they control the Trusted Module Platform. As well their are differences in commands and in the BitLocker architecture that we need to account for. In this script I have accounted for Microsoft Windows 7 and up.
Operating System
|
Language
|
Microsoft Windows 7
|
Batch
|
Microsoft Windows 8
|
PowerShell
|
Microsoft Windows 8.1
|
PowerShell
|
Secondly we need to account for various manufacturers and how they interact with the Bios and their individual WMI structure. This script accounts for the bellow Manufacturers and enables the TPM in the Bios without and user interaction.
Manufacturer
|
Solution
|
Toshiba
|
TPM.vbs
|
Lenovo
|
TPM.vbs
|
Dell
|
Dell Client Configuration Toolkit
|
Hewlett Packard
|
TPM.vbs
|
Stages
In order to activate the TPM and Encrypt your machines we have the four stages...
Stage
|
Purpose
|
Enable TPM in Bios
|
Assuming the TPM is disabled in the bios it is required to enable it.
|
Initialize the TPM
|
Windows requires us to initialize the TPM making it’s features available
to Windows
|
Take Ownership
|
Provide Ownership or permissions on the TPM to the user currently
running the script or in this case all Administrators on the machine
|
Encrypt the Hard Disk
|
Encryption of the Hard Disk
|
Add the Package
- Copy the Files to a temporary location
- Open the Deployment Workbench

- Navigate to the Applications Node

- Create an appropriate folder if you do not have one already
- Right click on your folder and choose new application

- Choose Application with Source Files and click Next

- Specify the Details for this Application

- Enter a Source Directory
(Your Temp Location) and click Next

- Click Next

- Enter the Name of the Batch

- Click Next

- Click Finish

- Right clikfc on your application and choose properties

- Check the hide this application and click apply

Changes to the Task Sequence
- Navigate to the Task Sequences Node

- Right click on the relevant Task Sequence and choose properties

- Choose the Task Sequence Tab

- Scroll Down toward the end of your Task Sequence after the Install Applications Task and click Add and choose Create a New Group if you do not already possess a an appropriate one

- Click on your group and return to the Add button and choose General-> Install Application

- Choose Install a single Application

- Click Browse and Navigate to the TPM Universal Application and click OK

- Copy and paste from Application to Install to Name

- Click on the Options Tab

- Click on Add and Choose If Statement

- Choose Any Conditions

- Click on Add Choose Query WMI
- Change WMI namespace to root\WMI

- WQL Query: SELECT * FROM BiosSetting WHERE TPM = "Enable"

- Click on Add Choose Query WMI
- Change WMI namespace to root\WMI
- WQL Query: SELECT * FROM BiosSetting WHERE TPM = "Disable"

- Click on Add WMI Query
- Change WMI namespace to root\WMI
- WQL Query: SELECT * FROM SELECT * FROM Lenovo_SetBiosSetting WHERE SecurityChip = "Active"

- Click on Add WMI Query
- Change WMI namespace to root\WMI
- WQL Query: SELECT * FROM SELECT * FROM Lenovo_SetBiosSetting WHERE SecurityChip = "Inactive"

- Click on Add WMI Query
- Change WMI namespace to root\WMI
- WQL Query: SELECT * FROM SELECT * FROM Lenovo_SetBiosSetting WHERE SecurityChip = "Disable"

- Click on Add WMI Query Change WMI namespace to Root\HP\InstrumentedBios
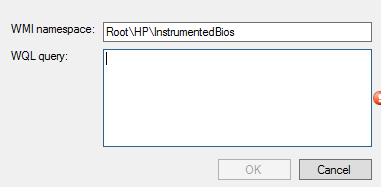
- WQL Query: SELECT * FROM SELECT * FROM HP_BIOSSettingInterface WHERE "TPM Device" Like "%%"

- Click on Add WMI Query
- WQL Query: SELECT * FROM SELECT * FROM Win32_ComputerSystem WHERE "Manufacturer" = "Dell"

- Check the Check Box Continue on Error and Click Apply

- Click on Add -> General -> Restart the Computer

- Repeat Steps 7-11 to account for all scenarios in the script and click Apply when finished
- Repeat Steps 11-30 for all six steps in your Task Sequence
- When you are finished your Task Sequence should appear like this

No comments:
Post a Comment